![OPI_with_Tag_RGB_300dpi_3in_tall-1.png]](https://knowledge.opisystems.com/hs-fs/hubfs/OPI_with_Tag_RGB_300dpi_3in_tall-1.png?height=50&name=OPI_with_Tag_RGB_300dpi_3in_tall-1.png)
Our OPI Blue system has fan control settings that will empower you to automate your fans. These settings will make decisions to run your fans only during times when conditions are optimal for drying your grain, controlling the temperature of the grain mass, or even re-hydrating the grain mass. There are three different modes for automation: Natural Air Drying (NAD), Natural Air Drying with Heater (NADH), and Aeration.
NAD
NAD is used to dry the grain down (or in some cases to re-hydrate the grain mass) to a desired moisture content. For example, if you harvested corn and it was measuring at 17% MC, you could set your system to run the fans to dry the grain down to 15%, if that was your desired conditioning goal.
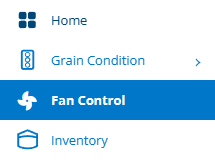
To set your system to run in NAD, navigate to the "Fan Control" page on the menu on the left-hand side.
From there, find the fan you want to configure to NAD and then click on the icon under the "Mode" column of the table. This will open up a page with a drop-down menu.

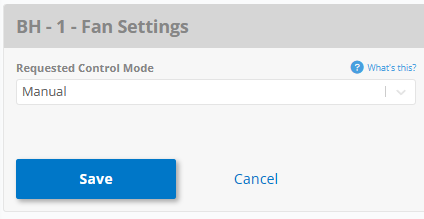
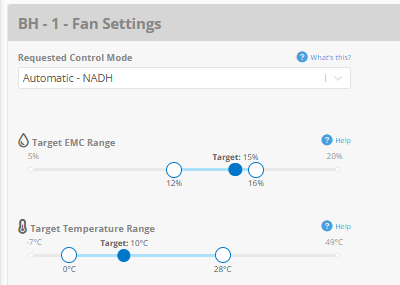
Open the drop-down menu and choose NAD. There will be a page opened with two target range settings, a warning notification, and an advanced fan settings section. Below are the Basic fan settings that you NEED to configure properly for Fan Control to work properly in NAD. They are the "Target EMC Range" and "Target Temperature Range". EMC stands for "Equilibrium Moisture Content" and represents the moisture content that the grain mass will reach if the fans turn on in the present ambient weather conditions.
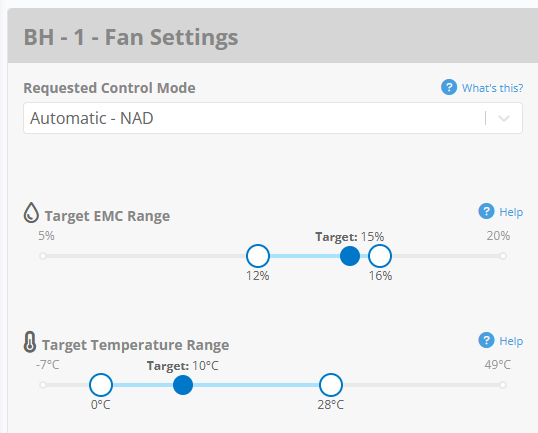
To bring us back to our example from above with the 17% corn that we wanted to dry down to 16%, we would do the settings something like the screenshot above. For the Target EMC Range, we would set the fans to run anything the EMC was calculated to be between 12% and 15%. And for the Target Temperature Range we would set the fans to run between 0 degrees Celsius and 28 degrees Celsius. To have the fans run more often you would increase the range of both settings, and to run less often you would likewise decrease the range of the settings.
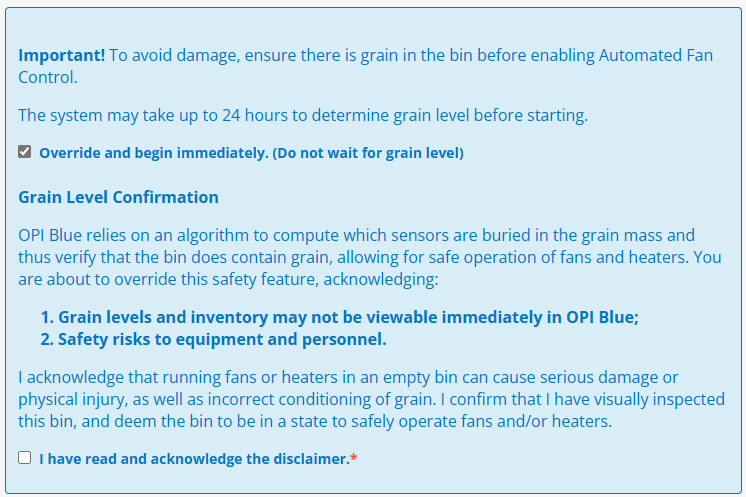
Below the Temperature and EMC range settings is a notification informing you about making sure to run your fans only when there is a grain mass inside the bin. Check off "Override and begin immediately. (Do not wait for grain level)" and "I have read and acknowledge the disclaimer." in order to start running the fans in NAD right away.
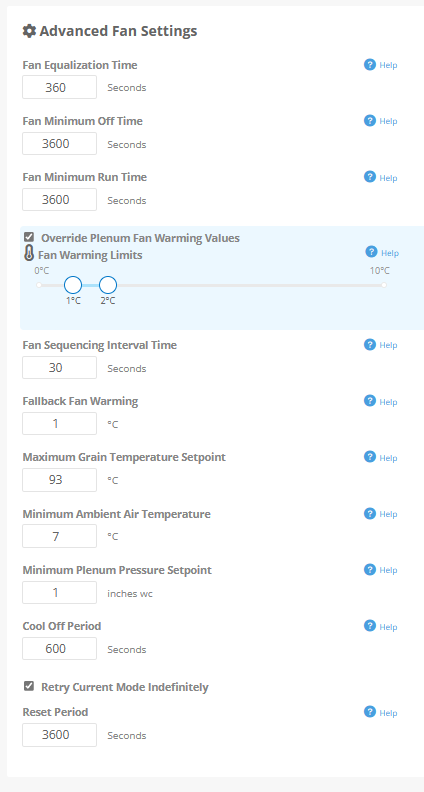
Finally, you have a section for "Advanced Fan Settings". These settings allow the user a great deal of customization and freedom in choosing how the fans are configured for automation.
Fan Equalization Time: This is the time after the fan turns on to allow for plenum conditions to become equalized with ambient potential conditions. (Default 360 seconds)
Fan Minimum Off Time: This setpoint is the minimum amount of time a fan must be turned OFF before it can be started up again. (Default 300 seconds)
Fan Minimum Run Time: This setpoint is the minimum amount of time a fan must be turned ON before it can be turned OFF. (Default 360 seconds). It must be greater than or equal to the fan equalization time.
Override Plenum Fan Warming Values: Are used as an alternative override input to the calculated fan warming used for fan control. Selecting the Fan Warming Override and using the sliders to set the minimum and maximum values ensures the fan warming value used during fan operation is always contained within the set range.
Fan Sequencing Interval Time: This setpoint is the minimum amount of time the system will wait between activating multiple fans. (Default 30 seconds)
Fallback Fan Warming: This is a temperature value due to heat of compression when the fan is ON. It is for when the actual value has not yet been measured at the plenum. (Default 4°F/2°C)
Maximum Grain Temperature Setpoint: The maximum allowable temperature any sensor within a structure can reach before triggering the fan(s) to turn ON. (Default 100°F/38°C)
Minimum Ambient Air Temperature: The minimum allowable ambient temperature to turn the fan(s) ON to prevent the vents from freezing. (Default 32°F/0°C)
Minimum Plenum Pressure Setpoint: The minimum measured static pressure setpoint that must be reached after the fan turns ON and has completed the Fan Equalization time. If the minimum pressure setpoint is not reached it will trigger an alarm. (Default 1.5”)
Cool Off Period: After a fan failure control system will wait with fans/heaters off for this length of time (in seconds) before retrying. (Default 600)
Reset Period: Number of seconds without panic required to reset the fail counter to zero. (Default 3600)
After you have configured your NAD settings to run according to your needs, you simply click on "Save" located at the bottom of the page: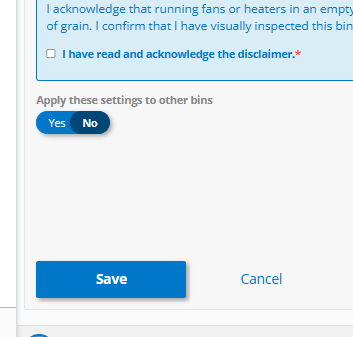
NADH
NADH is also used to dry the grain down to a desired moisture content, except it also uses a heater to expand the operating window that your fans can efficiently run to dry down your grain mass to the desired condition. For example, if you harvested corn and it was measuring at 17% MC, you could set your system to run the fans to dry the grain down to 15%, if that was your desired conditioning goal. The fans would run under similar settings to those chosen above for NAD, but the heater would kick on if the EMC value was higher than the upper boundary of the EMC slider and it was found that running the heater would drop the EMC back into a good condition for drying the grain.
To set your system to run in NADH, navigate to the "Fan Control" page on the menu on the left-hand side.
From there, find the fan you want to configure to NADH and then click on the icon under the "Mode" column of the table. This will open up a page with a drop-down menu.
Open the drop-down menu and choose NADH. There will be a page opened with two target range settings, a warning notification, and an advanced fan settings section. Below are the Basic fan settings that you NEED to configure properly for Fan Control to work properly in NADH. They are the "Target EMC Range" and "Target Temperature Range". EMC stands for "Equilibrium Moisture Content" and represents the moisture content that the grain mass will reach if the fans turn on in the present ambient weather conditions.
To bring us back to our example from above with the 17% corn that we wanted to dry down to 16%, we would do the settings something like the screenshot above. For the Target EMC Range, we would set the fans to run anything the EMC was calculated to be between 12% and 15%. And for the Target Temperature Range we would set the fans to run between 0 degrees Celsius and 28 degrees Celsius. To have the fans run more often you would increase the range of both settings, and to run less often you would likewise decrease the range of the settings.
Below the Temperature and EMC range settings is a notification informing you about making sure to run your fans only when there is a grain mass inside the bin. Check off "Override and begin immediately. (Do not wait for grain level)" and "I have read and acknowledge the disclaimer." in order to start running the fans in NADH right away.
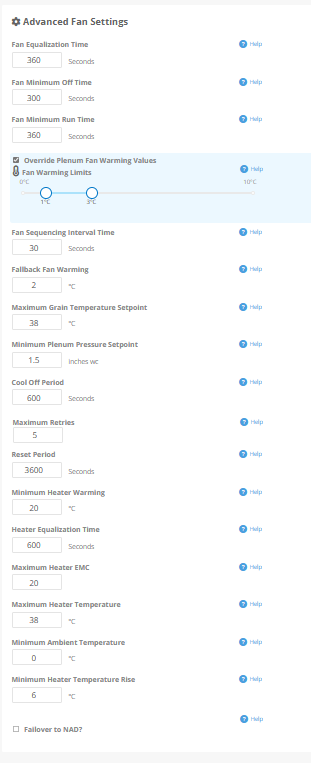
Finally, you have a section for "Advanced Fan Settings". These settings allow the user a great deal of customization and freedom in choosing how the fans are configured for automation.
Fan Equalization Time: This is the time after the fan turns on to allow for plenum conditions to become equalized with ambient potential conditions. (Default 360 seconds)
Fan Minimum Off Time: This setpoint is the minimum amount of time a fan must be turned OFF before it can be started up again. (Default 300 seconds)
Fan Minimum Run Time: This setpoint is the minimum amount of time a fan must be turned ON before it can be turned OFF. (Default 360 seconds). It must be greater than or equal to the fan equalization time.
Override Plenum Fan Warming Values: Are used as an alternative override input to the calculated fan warming used for fan control. Selecting the Fan Warming Override and using the sliders to set the minimum and maximum values ensures the fan warming value used during fan operation is always contained within the set range.
Fan Sequencing Interval Time: This setpoint is the minimum amount of time the system will wait between activating fans from other bins site wide in case they are called to run at the same time. (Default 30 seconds)
Fallback Fan Warming: This is a temperature value due to heat of compression when the fan is ON. It is for when the actual value has not yet been measured at the plenum. (Default 4°F/2°C)
Maximum Grain Temperature Setpoint: The maximum allowable temperature any sensor within a structure can reach before triggering the fan(s) to turn ON. (Default 100°F/38°C)
Minimum Plenum Pressure Setpoint: The minimum measured static pressure setpoint that must be reached after the fan turns ON and has completed the Fan Equalization time. If the minimum pressure setpoint is not reached it will trigger an alarm. (Default 1.5”)
Cool Off Period: After a fan failure control system will wait with fans/heaters off for this length of time (in seconds) before retrying. (Default 600)
Reset Period: Number of seconds without panic required to reset the fail counter to zero. (Default 3600)
Minimum Heater Warming: Heater will raise plenum temperature by this amount. This is an initial value. If the heater is turned on and after waiting for heater Equalization Time the heater warming is found to be different then a new value will be used.
Heater Equalization Time: The time in which fan and heater are ON waiting for the plenum sensor to reach its ultimate temperature biased on Ambient and Heater Warming.
Maximum Heater EMC: Heater will not run if calculated Heater EMC exceeds this value.
Maximum Heater Temperature: User configurable maximum set temperature that when reached results in the heaters being shut OFF. This is a preventative measure to prevent damage to the grain that can occur when exposed to too high a temperature.
Minimum Ambient Temperature: A set temperature value in which a warning will appear to notify the user the risks of running the fans below freezing.
Minimum Heater Temperature Rise: This is the minimum calculated temperature increase at the plenum that must be achieved in order to validate that the heater(s) are physically running as expected when the system has called for them to be ON. (Default 10°F/6°C)
Failover to NAD?: Enables NAD failover. If disabled, a gateway panic will result in a roll over to manual.
After you have configured your NADH settings to run according to your needs, you simply click on "Save" located at the bottom of the page:
Aeration
Aeration is used to cool the grain mass down to a desired Temperature that is consistent throughout the grain mass. For example, if you achieved the 15% MC corn from the above example, but the bottom of the grain mass was 5 degrees Celsius and the top of the grain mass was 25 degrees Celsius, then you would want to make the grain mass a more consistent temperature throughout the bin structure in order to make it more stable for long term storage. To continue this example, let's say you want to make the grain mass 5 degrees Celsius throughout the entire mass. To do this you would configure the bin to Aeration mode.
To set your system to run in Aeration, navigate to the "Fan Control" page on the menu on the left-hand side.
From there, find the fan you want to configure to Aeration and then click on the icon under the "Mode" column of the table. This will open up a page with a drop-down menu.
Open the drop-down menu and choose Aeration. There will be a page opened with two target range settings, a warning notification, and an advanced fan settings section. Below are the Basic fan settings that you NEED to configure properly for Fan Control to work properly in Aeration. They are the "Target EMC Range" and "Target Temperature Range".
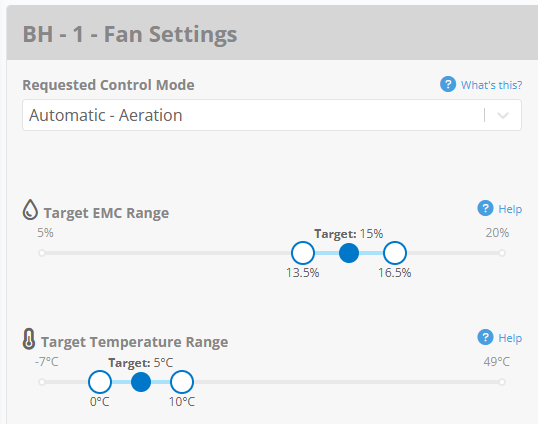
To bring us back to our example from above with the 17% corn that we have already dried down to 15%, we would do the settings something like the screenshot above. For the Target EMC Range, we would set the fans to run anything the EMC was calculated to be between 13.5% and 16.5%. And for the Target Temperature Range we would set the fans to run between 0 degrees Celsius and 10 degrees Celsius. To have the fans run more often you would increase the range of both settings, and to run less often you would likewise decrease the range of the settings.
Below the Temperature and EMC range settings is a notification informing you about making sure to run your fans only when there is a grain mass inside the bin. Check off "Override and begin immediately. (Do not wait for grain level)" and "I have read and acknowledge the disclaimer." in order to start running the fans in Aeration right away.
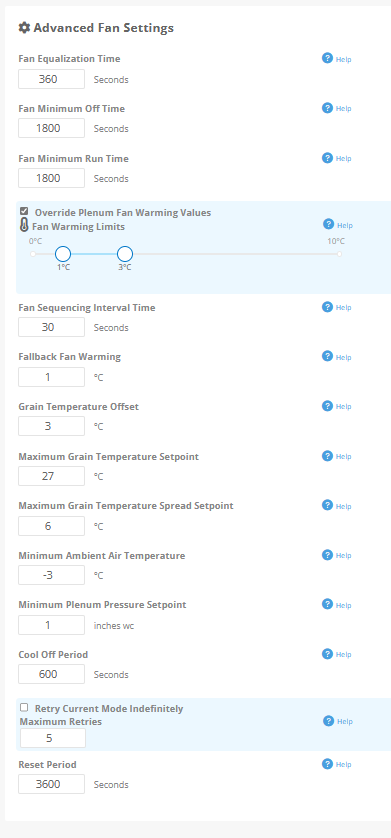
Finally, you have a section for "Advanced Fan Settings". These settings allow the user a great deal of customization and freedom in choosing how the fans are configured for automation.
Fan Equalization Time: This is the time after the fan turns on to allow for plenum conditions to become equalized with ambient potential conditions. (Default 360 seconds)
Fan Minimum Off Time: This setpoint is the minimum amount of time a fan must be turned OFF before it can be started up again. (Default 300 seconds)
Fan Minimum Run Time: This setpoint is the minimum amount of time a fan must be turned ON before it can be turned OFF. (Default 360 seconds). It must be greater than or equal to the fan equalization time.
Override Plenum Fan Warming Values: Are used as an alternative override input to the calculated fan warming used for fan control. Selecting the Fan Warming Override and using the sliders to set the minimum and maximum values ensures the fan warming value used during fan operation is always contained within the set range.
Fan Sequencing Interval Time: This setpoint is the minimum amount of time the system will wait between activating multiple fans. (Default 30 seconds)
Fallback Fan Warming: This is a temperature value due to heat of compression when the fan is ON. It is for when the actual value has not yet been measured at the plenum. (Default 4°F/2°C)
Grain Temperature Offset: The difference required below grain temperature to trigger fan. This prevents the fan from running with no grain in the structure. (Default 5°F/3°C)
Maximum Grain Temperature Setpoint: The maximum allowable temperature any sensor within a structure can reach before triggering the fan(s) to turn ON. (Default 100°F/38°C)
Maximum Grain Temperature Spread Setpoint: The maximum allowable temperature spread within a structure before triggering the fan(s) to turn ON. (Default 20°F/12°C)
Minimum Ambient Air Temperature: The minimum allowable ambient temperature to turn the fan(s) ON to prevent the vents from freezing. (Default 32°F/0°C)
Minimum Plenum Pressure Setpoint: The minimum measured static pressure setpoint that must be reached after the fan turns ON and has completed the Fan Equalization time. If the minimum pressure setpoint is not reached it will trigger an alarm. (Default 1.5”)
Cool Off Period: After a fan failure control system will wait with fans/heaters off for this length of time (in seconds) before retrying. (Default 600)
Reset Period: Number of seconds without panic required to reset the fail counter to zero. (Default 3600)
After you have configured your Aeration settings to run according to your needs, you simply click on "Save" located at the bottom of the page: