![OPI_with_Tag_RGB_300dpi_3in_tall-1.png]](https://knowledge.opisystems.com/hs-fs/hubfs/OPI_with_Tag_RGB_300dpi_3in_tall-1.png?height=50&name=OPI_with_Tag_RGB_300dpi_3in_tall-1.png)
Must Have Tools & Equipment
- Philips screwdriver
- 1/8” flathead screwdriver
- 7/16” wrench
- 1” socket with ratchet
- Cordless Drill with 3/8” Nut Driver
- Drill Step Bit
- Wire stripper
- Cable Node Jumper or a magnet
Removal of Existing Non-CO2 Hardware in www.managegrain.com
- In www.managegrain.com under System Settings go into Gateways and Nodes and locate the Fan Node you are going to be adding the new Grain Quality Sensor to.
- Unmap the existing Fan Node from the Gateway.
Adding the Plenum Grain Quality Sensor (CO2) & New Fan Node
- Disconnect the power to the Fan Node.
- Disconnect the Fan Node Radio, PP0T, Weather Station (if applicable) and any wires from the 2 outputs.
- Pull the INT3 wire from the PP0T out of the enclosure through the strain relief.
- Unmount the Fan Node from the enclosure by removing the 4 Philips screws.
- Mount the new Fan Node into the enclosure with the 4 Philips screws from the previous Fan Node.
- Unmount the existing PP0T from the bin. Note: To make it easier to fish the INT3 cable from the new Plenum Grain Quality Sensor through the conduit, you can remove the cover off the existing PP0T and disconnect the INT3-wire from it. Tape the ends of the old INT3 cable to the end of the INT3 on the Plenum Grain Quality Sensor and pull it back through the conduit to towards the Fan Node Enclosure. (If conduit was used)
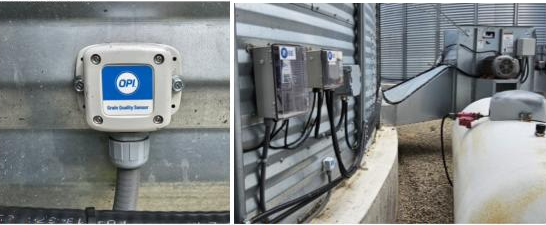
- Mount the new BLUE-PGQS into the exact location in which the old PP0T was previously removed from.
- Pull the INT3 cable in through the ½” fitting on the Fan Node Enclosure and cut to length.
- Terminate all previously disconnected cables back to the Fan Node. (Fan Node Radio, Plenum Grain Quality Sensor, Weather Station (if applicable), the Fan/Heater and the Power.)
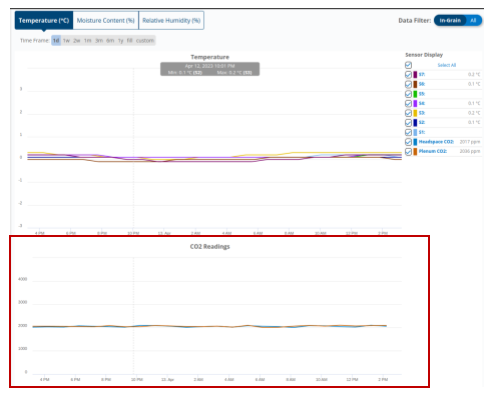
- Under the System Settings go into Sites and Bins and locate the bin you are going to be adding the Grain Quality Sensor(s) to. Once you have added the Plenum CO2 Sensor to the bin it will appear as shown below.

Note: The Fan Node is a powered device, so the CO2 readings in the plenum will report every 5-minutes and be logged on the graph in the Charts tab under Bin Data. - The Plenum and/or Headspace CO2 data will appear in the Grain Condition->Bin Data->Charts located underneath the Cable Sensor chart.