![OPI_with_Tag_RGB_300dpi_3in_tall-1.png]](https://knowledge.opisystems.com/hs-fs/hubfs/OPI_with_Tag_RGB_300dpi_3in_tall-1.png?height=50&name=OPI_with_Tag_RGB_300dpi_3in_tall-1.png)
Required Materials
- Stormax Monitor
- Something to take notes with (Pen and Paper)

Defining Your Site
Before you start, the following are required:
- Knowledge of the site, storage structures, and the grain being stored
- When only temperature is being monitored, know the placement of the temperature cables (all of them) in the structures
- When temperature and moisture content are being monitored, know the placement of the moisture cables (all of them) in the structures. There may be a combination of temperature and moisture cables in the same bin.
- A pen or pencil
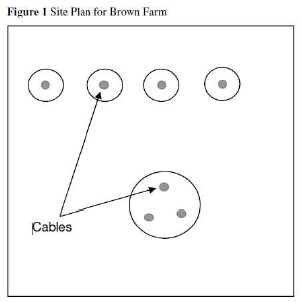
Make a drawing of your site. Ensure the following are included:
- A plan view for the storage structures that will be monitored at the site
- Identify how many cable(s) will be installed in each structure
- Indicate where the cables will be installed in the structures.
- Refer to the Figure 1 for an example of a site plan.
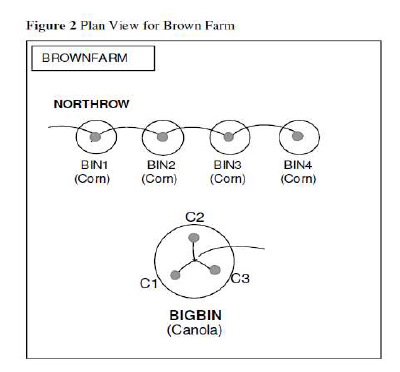
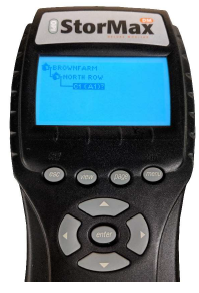
The next things to include in your site plan are the Group Names, the Structure Names, the cable names, and the Grain Types as they correspond to each structure. You can see an example of a completed Site plan in Figure 2 which includes all of this information.
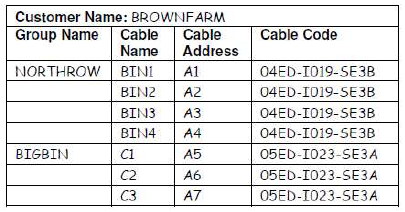
The next step is going to be to list your site data in a table. Include in the table the Site/Customer Name, the Group Names, the Cable Names, the Cable Addresses, and the Cable Codes. Please note that all addresses begin with the letter “A” and range from 1-255, and they need to be unique for each cable.
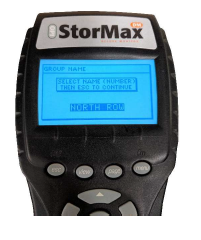
Configure Monitor – Customer Name
- While highlighting the customer name, press “Menu”
- While Highlighting “Change Customer Name”, press enter.

- Press the “Up” arrow key to erase the current customer name.
- Press Enter to create a new customer name.
- With the cursor highlighted on the first space, use the “Up” and “Down” arrow keys to select a letter. The first character of the Customer Name, only letters can be used.

- Use the “Right” arrow key to move to the next letter space. Repeat the previous steps to continue choosing letters until the name is completely entered. You may now choose numbers or the space character.
- Press “Enter” to save the new name.
- Press the “Esc” button to return to the “View” screen. The new name should appear in the top left.

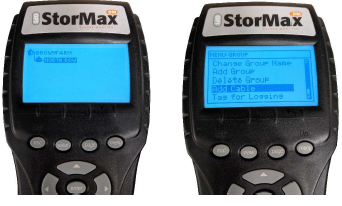
Configure Monitor – Add Group
- Press “View” to return to the view screen. Press enter, and then use the “Up” and “Down” arrow keys to highlight the “Add Group” option.
- While highlighting “Add Group”, press enter.

- Press the “Up” arrow key to scroll to the blank option, and press “Enter”.
- With the cursor highlighted on the first space, use the “Up” and “Down” arrow keys to select a letter. The first character of the Group, only letters can be used.
- Use the “Right” arrow key to move to the next letter space. Repeat the previous steps to continue choosing letters until the name is completely entered. You may now choose numbers or the space character.
- Press “Enter” to save the new Group.
- Press the “Esc” button to return to the “View” screen. The new Group should appear in the top left, under the customer name.

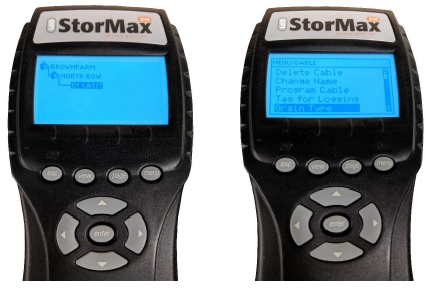
Configure Monitor – Add Cables
- Press “View” to return to the View screen. Press the “Up” or “Down” arrows to highlight the name of the group where you want to add the new cable. Press “Menu”.
- Press the “Up” or “Down” arrows to highlight the “Add Cable” option. Press “Enter”
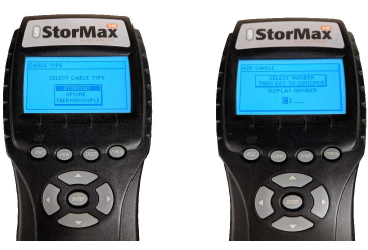
- Move the “Up” and “Down” arrow keys to highlight the cable type. In almost all cases, it will be a Stormax Cable. Select “Enter”.
- Select the “Up” arrow key until you can select the option with a blank field in order to create a new Cable Name. Press “Enter”.
- With the cursor highlighted on the first space, use the “Up” and “Down” arrows to select a letter between A and Z or a number between 0 and 9 for the first character.
- Use “Left” and “Right” to move the cursor between the characters, and repeat previous step to choose the cable name. Press “Enter”, and “Esc” to continue.

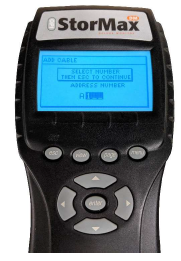
- With the cursor highlighted on the first space, use the “Up” and “Down” arrows to select a number between 0 and 9 for the Cable Address. The Cable Address can be a number between 1 and 255. Press “Enter” to save the Address and “Esc” to continue.
- Each cable programmed into a Stormax Monitor must have a unique cable address.
- A screen will appear asking if you would like to connect the cable now. You may do so if you are at the cable install location, otherwise select later.
- Once this process is done, you will see the cable located on the View screen under the Group Name it was assigned to. If there is a “?” next to the cable, you will need to program the cable later.

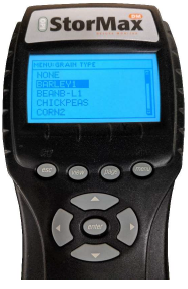
Assign Grain Type
- If you have temperature cables only, you may skip this step.
- You can assign a Grain Type in two ways: Assign it to a whole group and all cables assigned to that group, or to individual cables.
- To assign a Grain Type to a group, use the “Up” and “Down” arrows to navigate the View screen until you are highlighting the group name you want to assign the Grain Type to. Press “Menu”.
- Press the “Up” and “Down” arrows to highlight the Grain Type option. Press “Enter”.
- Press the “Up” and “Down” arrows to scroll through the various types of grain. Highlight the correct Grain Type. Press “Enter”.
- The View screen will re-appear. The same Grain Type will be added to all the cables in that Group.
- To assign a Grain Type to a specific cable, use the “Up” and “Down” arrows to navigate the View screen until you are highlighting the cable you want to assign the Grain Type to. Press “Menu”.
- Press the “Up” and “Down” arrows to highlight the Grain Type option. Press “Enter”.

- The View screen will re-appear. The selected Grain Type will be added to the cable that was originally highlighted.

Programming Cables
- You will need the cable information from you initial site-map, specifically the table referenced on slide 6.
- Press “View” to return to the View screen. Press the “Up” or “Down” arrow keys to navigate to the cable that needs to be programmed. Highlight that cable. Press “Menu”.
- Use the “Up” and “Down” arrow keys to highlight “Program Cable”. Press “Enter”.
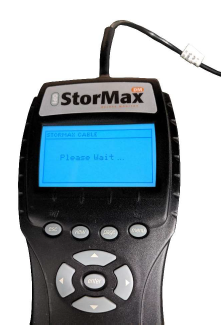
- The Connect Cable screen will appear. Connect the corresponding Cable to the top of the monitor. Use the “Up” and “Down” arrow keys to highlight “Ok”. Press “Enter”.
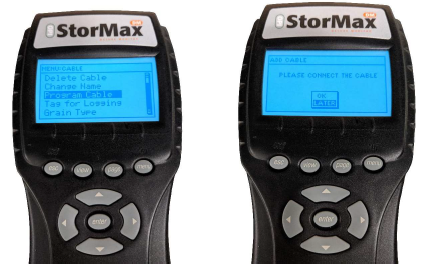
- The View screen will re-appear. The cable you just programmed will be highlighted. Before proceeding to program the next cable, verify that the highlighted cable is in the correct group, has the correct Cable Name, has the correct address (in brackets), has the correct Grain Type, and has the letter L beside the address to denote that the cable is set for logging.

- After a few seconds, a Please Wait message will appear on the screen. Shortly after that, the main sensor reading screen will appear. Verify that the main sensor screen displays the correct group name in the top left corner, the correct cable names below each column, and a complete set of sensor readings that corresponds to the sensor numbers on the cable, with S1 at the bottom of the cable.